

Up until now, we have learned how to use prompts in OpenAI Playground to do some basic chat with our bot on mental health (Part 1). In Part 2 of this series of tutorials, I made a small Node.js program that uses the OpenAI API to talk to the bot. Now, in this tutorial, I will cover the details behind GPT 3 fine tuning.
This blog is a part of three tutorial series which covers
- Part 1 – How to train OpenAI GPT-3.
In this part, I used the playground provided by OpenAI to train GPT-3 according to our case on mental health
- Part 2 – Create GPT-3 application with Node.js.
This tutorial covered how the training data used above can be used inside a real application
- Part 3 – GPT 3 fine-tuning.
In this blog, I will teach you how to fine-tune our application to send the best responses while reducing costs.
Introduction to Fine Tuning
Fine tuning is the process of creating our own custom models from one of the existing GPT 3 models, e.g. Davinci, Curie, Babbage, Ada, etc., which can be used as a new base template later. The prompt design uses what is called a “few-shot learning” approach where a few example prompts are provided, and then it tries to guess/complete the result for the given scenario using its existing training on similar data sets from the internet. Fine-tuning makes the design of the prompt better by training with more specific examples for a given situation.
Benefits of Fine Tuning model over Prompt design
- Fetches higher quality results than the prompt design as it is trained with more custom examples.
- Saves tokens as the Fine-tuned model doesn’t need to be supplied with prompts and hence no prompt tokens.
- Has low latency as prompts need not be read and processed.
- Can be trained on more custom examples than the Prompt design.
Creating a Fine-Tuned model
Now, let’s dive into the processes of creating our custom GPT 3 Fine Tuned model on Mental health
Step 1: OpenAI CLI Installation
OpenAI CLI tool requires Python 3 installed on your system, and the following commands work only with OpenAI v0.9.4 and above.
To install the tool on your machine and other dependencies, run
pip install --upgrade openai
pip install openai[datalib]
Note: On Windows, you might need to add a path in the environment variable after installing OpenAI tools. In my case, it was located in C:\Users\<Username>\AppData\Local\Packages\PythonSoftwareFoundation.Python.3.9_qbz5n2kfra8p0\LocalCache\local-packages\Python39\Scripts
Set up the environment variable, OPENAI_API_KEYin your shell or terminal by running the following command.
export OPENAI_API_KEY="<OPENAI_API_KEY>"Remember, a key can be obtained from View API Keys in accounts.
Step 2: Preparing data for training
In this section, we will learn how to train one of the existing base models of GPT 3 to be specific to our model. The data preparation is done in JSON Lines format (short JSONL) which accepts JSON objects in new lines which is convenient for storing structured data which are processed one line at a time. Here is an example of JSONL format
{"prompt": "<prompt text>", "completion": "<ideal generated text>"}
{"prompt": "<prompt text>", "completion": "<ideal generated text>"}
{"prompt": "<prompt text>", "completion": "<ideal generated text>"}
...
OpenAI has developed a tool called the CLI data preparation tool, which formats and suggests input from an external file as CSV, TSV, XLSX, JSON, or JSONL and outputs a single JSONL file. The tool also assists with guiding steps in the process. In our case, let’s use the CLI data preparation tool to make a file in JSONL format.
In our example model, we will use our existing JSON data to convert to JSONL. I have created a file “mental_health.jsonl” and copied the content from our example.
{"prompt": "I have a mental health issue", "completion": "Alright, we will try to understand the issue and identify the root cause. Once we understand your problem thoroughly, we will try to find a solution."}
{"prompt": "I have a very abusive manager at the office", "completion": "Can you give me some background about your office culture"}
{"prompt": "I work in a multi-national company and my manager is not sympathetic toward the problems in team building. Instead, he thinks that these are non-issue and we should only focus on work and compete with each other", "completion": "Lets try to understand your office work and your manager's nature"}
Remember to use the prompt and completion keys. Also, all the JSON objects should be on new lines. Then check the file using the following command
openai tools fine_tunes.prepare_data -f mental_health.jsonlIf everything is ready, we are ready to go to the next step
Step 3: Creating a Fine-tuned model
Now we can start Fine Tuning a model using the following command.
openai api fine_tunes.create -t mental_health.jsonl -m davinciInput params
-t: Earlier created .jsonl dataset file
-m: a base model for GPT 3. Although it defaults to curie, we will use davinci for testing purposes. It depends on your case and also directly affects the tokens consumed.
Creating a new GPT 3 fine-tuned model does 3 things
- Uploads the file using the files API (or uses an already-uploaded file)
- Creates a fine-tuned job
- Streams events until the job are done
Our model is a small one, and it should be uploaded in a few minutes. Also, the uploading time depends on the current queue of other GPT 3 Fine Tune model uploads and the size of the training dataset. Once done, we should see the name of the fine-tuned model, like in the screenshot below.

We can retrieve the list of models using
openai api fine_tunes.listNote: If you encounter the error below, you might need to downgrade to OpenAI v0.25.0. As of writing the blog, the current version 0.26.0 throws this error.

Run the following commands to fix the issue
pip uninstall openai
pip install openai==0.25.0
Step 4: Running the Model using Node.js
Let’s revisit our code in GitHub from Part 2 of this tutorial series. I will change some of the code inside our /openai-api route and remove the promptContext variable altogether as it is already in the new model now. Also, change the name of the model to our new model’s name.
const express = require("express");
const cors = require("cors");

// Import the OpenAI
const { Configuration, OpenAIApi } = require("openai");

// Create a new OpenAI configuration and paste your API key
// obtained from Step 1
// The key displayed here is a fake key
const configuration = new Configuration({
    apiKey: "sk-grcXXXXJn5KZHXXX7rT3BlbkFJtufXz7xErXXXXXXXXW",
});
const openai = new OpenAIApi(configuration);

const bodyParser = require("body-parser");

const app = express();
app.use(cors());
app.use(bodyParser.urlencoded({ extended: false }));
app.use(bodyParser.json());

const port = 3000;

// create a post route
app.post("/openai-api", async (req, res) => {
    const data = req.body;

    // Fine-Tune Model
    // Dont promptContext and changed the model name to our Fine Tune model


    const response = await openai.createCompletion({
        model: "davinci:ft-personal:mental-health-new-2023-01-10-08-09-36",
        prompt: `${data.queryPrompt} ?`,
        temperature: 0,
        max_tokens: 60,
        top_p: 1,
        frequency_penalty: 0,
        presence_penalty: 0,
    });
    console.log(response.data);
    res.json(response.data);
});

app.listen(port, () => {
    console.log(`Node server listening at http://localhost:${port}`);
});
So, after saving the file as server_with_fine_tune_model.js, let’s run as
node server_with_fine_tune_model.jsHit http://localhost:3000/openai-api from Postman with some post data
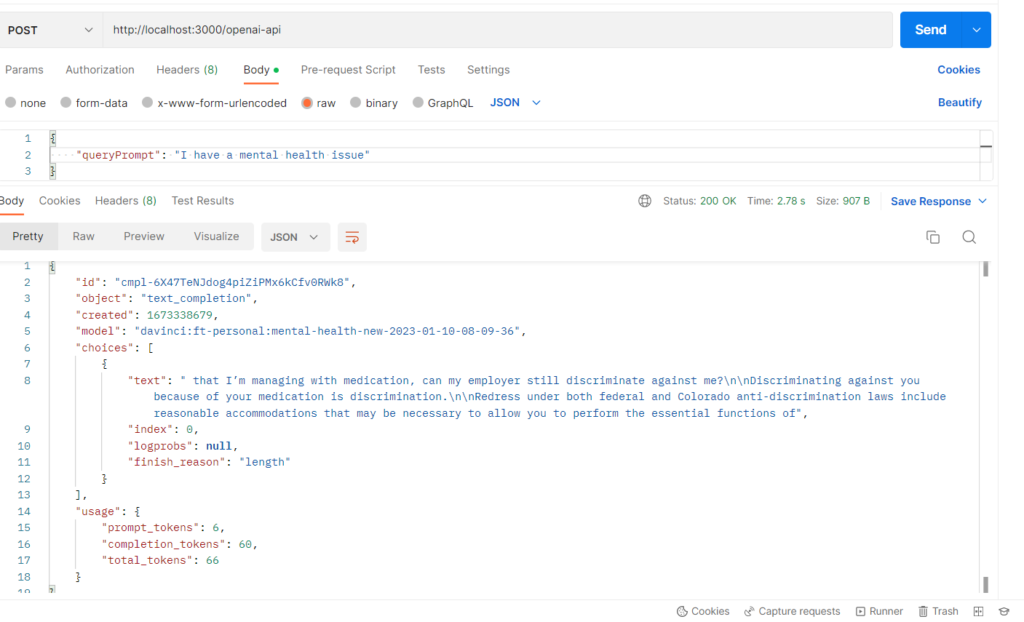
Bingo! Our new model works. However, you can see that the results are not as expected, as our training data set was not good. It is recommended that we train with at least a few hundred high-quality examples (approximately 500). With more examples, the performance also improves a lot. You can read more about dataset examples and best practices here.
Conclusion
In this tutorial, we saw how we can fine-tune the GPT 3 model for our custom scenario. Also discussed is how the new model can be integrated into a Node.js application. Using fine-tuned models in the background, we can use any programming language we want to make a wide range of apps. Another alternative to fine-tuning the GPT-3 model ourselves is hiring a GPT-3 developer from Toptal who can help us integrate the model into our Node.js application with ease.

Hi,
Very nice content.
From where did you get davinci:ft-personal:mental-health-new-2023-01-10-08-09-36?
Thanks. You can create any model that you want if you read the tutorial. I created the model that you mentioned above.